Observable 複数データソース に優先順位をつける

通信を使うとき, 必要になるだろうよくあるパターンだと思います.

通信状況や不要なリクエストやキャッシュを使うかどうか.

どこからデータを取得してくるか.

- メモリ
- ストレージ
- ネットワーク

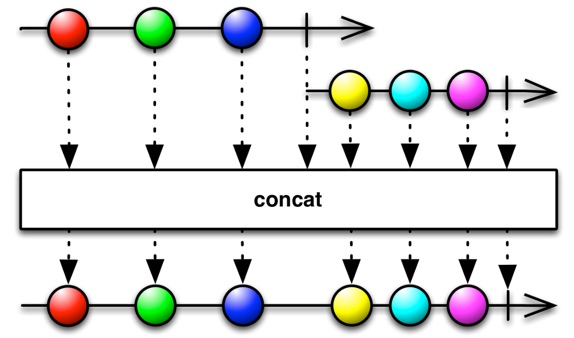
それぞれのソース別に Observable を作ったら, 優先順位をつけたら連結する.

ReactiveX_-_Concat_operator

ReactiveX - Concat operator

条件をつけて, 最初の一つだけ利用する.

ReactiveX_-_First_operator

ReactiveX - First operator

そんなサンプルコードがあります.


// Create our sequence for querying best available data
Observable<Data> source = Observable.concat(
    sources.memory(),
    sources.disk(),
    sources.network()
  )
  .first(data -> data != null && data.isUpToDate());

// "Request" latest data once a second
Observable.interval(1, TimeUnit.SECONDS)
  .flatMap(__ -> source)
  .subscribe(data -> System.out.println("Received: " + data.value));

rxjava-multiple-sources-sample/Sample.java


public Observable<GfyItem> getGfyItem(final String gifUrl, final String gfyName) {

  // Use the first source that returns a valid name
  return Observable.concat(

    // We already have the name
    Observable.just(gfyName),

    // We check for a pre-converted gif (for the gfyname)
    getPreExistingGfyName(gifUrl),

    // We need to convert the gif (then retrieve the gfyname)
    convertGifToGfyName(gifUrl)
  )
  .first(result -> !TextUtils.isEmpty(result))
  .flatMap(this::getMetadata)
  .map(GfyMetadata::getGfyItem);
}

android-gfycat/GfycatService.java

非常にわかりやすいサンプルや記事で勉強になりますっ.

Loading data from multiple sources with RxJava


エンジニア年収の「地域格差」は確かにある

エンジニアの年収データをスプレッドシートに記入させて集めているようです.

Why not just a simple spreadsheet of salaries? | Hacker News

アンケートフォームから入力すると, スプレッドシートに記入されて公開されます.

Salaries

Salaries_-_Google_スプレッドシート

Salaries - Google スプレッドシート

このデータはCSV形式で抽出できるのでそれを利用してあれこれやっております.

explore_salaries

Data Visualization of Hacker News Salary Spreadsheet — Medium

その結果視覚的にいろいろわかりやすくなって, あきらかにヨーロッパに比べてのシリコンバレーの年収は高いようです.

Data_Visualization_of_Hacker_News_Salary_Spreadsheet_—_Medium

勤務年数や経験年数は関係なく, 最初から, 2~3倍の年収の違いが見えます.

Data_Visualization_of_Hacker_News_Salary_Spreadsheet_—_Medium 2

優秀な人が集ってこうなるのか, お金があるから優秀な人が集まるのか, 都市別.

Data_Visualization_of_Hacker_News_Salary_Spreadsheet_—_Medium 3

これだけインターネットが発達してリモートな開発がしやすくなりましたが, ここまで差がでるとな.

まあ, それなりに狭い分母だとは思いますが.

jrenner/hacker-news-salaries-data: Data exploration of software developer salary info from Hacker News

本の虫: 元Google社員、社内での給与額の公開運動について語る

Hacker News Radio (翻訳) - Google Play の Android アプリ


コマンドラインで stackoverflow を快速に検索できる「how2」

使い方はこうです.

usage: how2 [-l python/ruby/etc.] search string

コマンドである「how2」に続いて, 検索したいキーワードを入力します.

bz2

言語 (タグ?) を限定する場合はオプション「 -l 」を付けます.

例えば, キーワードを「retrolambda」「RxJava」として android 関連の情報を探します.

$ how2 -l android retrolambda rxjava

how2

さらに他に情報を見たい場合は [SPACE] を押すと一覧で表示されて選択できます.

__—_how2 2

__—_how2 3

__—_how2 4

これはもう「tldr」よりも広く分かりやすい説明をみつけることができそうです.

インストールは以下で.

$ brew install node
$ npm install -g how2

santinic/how2: stackoverflow from the terminal

man は長すぎるので「tldr」


【AndroidStudio 不要】サンプルアプリは「dryrun」で試してすぐ捨てよう

参考にしたいサンプルアプリをGiHubで見つけて試してみる場合は以下のような手順

1. サンプルアプリのリポジトリを探す.
2. zip をダウンロードする.
3. それを展開する.
4. AndroidStudio などIDEを開く.
5. インポートする.
6. Gradle が sync する.
7. プロジェクトを run.
8. 実行するデバイスを選択する.
9. 実際に動かしてみる.
10. zipファイルとプロジェクトフォルダを捨てる.

となりますが,「dryrun」をインストールすると

$ gem install dryrun
...
$ dryrun -h
Usage: dryrun GITHUB_URL [OPTIONS]

Options
    -m, --module MODULE_NAME         Custom module to run
    -p, --path PATH                  Custom path to android project
    -h, --help                       Displays help
    -v, --version                    Displays version

dryrun: Try the demo project of any Android Library

リポジトリのURLのみでターミナルからの一行で起動までが可能になります. AndroidStudioなどIDEは起動しなくてよいです.

プロジェクトディレクトリは残りません.

$ dryrun https://github.com/cesarferreira/android-helloworld

usage_v2

cesarferreira_dryrun__Try_the_demo_project_of_any_Android_Library

アプリ起動後, 動かしてみて, いらなくなったらターミナル出力の最終行に表示されているadbコマンドでアンインストール.

...
> If you want to remove the app you just installed, execute:
adb uninstall github.cesarferreira.helloworld

あなたのマシンには試したテストアプリの不要なプロジェクトディレクトリがたくさんありませんか?

man は長すぎるので「tldr」


Android Studio 使えるエディタのテーマを「Color Themes」

IDEのエディタのテーマ集があります.

Color_Themes

Color_Themes 2

Color_Themes

Color Themes

ダウンロードしてインポートするだけ.

How to install a theme?

Select «File» → «Import Setting» from the main menu and follow the instructions. After the IDE restarted go to the Preferences, expand «Editor» → «Colors and fonts» tab and choose the installed theme.

IntelliJ IDEA に使えるということで AndroidStudio でも使えます.

Which IDEs are supported?

Themes on this site support fully all family of JetBrains' IDEs: IntelliJ IDEA, PhpStorm, PyCharm, RubyMine, WebStorm and AppCode.

y-a-r-g/color-themes